Connecting your Raspberry Pi to AWS (Amazon Web Services) through a Virtual Private Cloud (VPC) is a powerful way to securely manage IoT devices and data. This setup allows you to harness the full potential of cloud computing while ensuring your IoT infrastructure remains secure and scalable. With the increasing demand for remote IoT solutions, securely connecting your Raspberry Pi to AWS VPC has become a critical step for developers, businesses, and tech enthusiasts alike. In this article, we will explore how you can achieve this setup securely and cost-effectively, even using AWS's free tier.
Whether you're a developer building IoT applications or a business owner looking to optimize remote operations, understanding how to securely connect your Raspberry Pi to AWS VPC is essential. This guide will walk you through the entire process, from setting up your Raspberry Pi to configuring AWS services, ensuring that your data remains protected while leveraging the benefits of cloud computing.
In today’s interconnected world, IoT devices like the Raspberry Pi are increasingly being used to collect and process data remotely. However, without proper security measures, these devices can become vulnerable to cyberattacks. By securely connecting your Raspberry Pi to AWS VPC, you can ensure that your IoT infrastructure is not only efficient but also protected from potential threats. Let’s dive into the details of how to achieve this setup step by step.
Table of Contents
- Introduction to RemoteIoT, VPC, and Raspberry Pi
- Benefits of Securely Connecting Raspberry Pi to AWS VPC
- Prerequisites for Setting Up the Connection
- Setting Up Your Raspberry Pi for AWS Integration
- Configuring AWS VPC for Raspberry Pi
- Establishing a Secure Connection
- Monitoring and Maintaining the Connection
- Cost Optimization with AWS Free Tier
- Troubleshooting Common Issues
- Conclusion and Next Steps
Introduction to RemoteIoT, VPC, and Raspberry Pi
RemoteIoT refers to the management and monitoring of IoT devices from a remote location. This is particularly useful for businesses and individuals who need to oversee IoT operations without being physically present. A Virtual Private Cloud (VPC) is a secure and isolated private cloud hosted within a public cloud like AWS. It allows users to run their applications and services in a virtual network that they control.
The Raspberry Pi, on the other hand, is a compact, affordable, and versatile single-board computer that has become a staple in the IoT world. Its small form factor and low power consumption make it ideal for IoT applications. When combined with AWS VPC, the Raspberry Pi can serve as a powerful edge device, capable of processing data locally while securely transmitting it to the cloud for further analysis.
By integrating RemoteIoT with AWS VPC and Raspberry Pi, users can create a robust and scalable IoT infrastructure. This setup not only enhances security but also improves efficiency by leveraging AWS's powerful cloud services.
Benefits of Securely Connecting Raspberry Pi to AWS VPC
One of the primary benefits of securely connecting your Raspberry Pi to AWS VPC is enhanced security. AWS VPC provides a private network environment where you can control access to your resources, ensuring that your IoT data remains protected from unauthorized access.
Another advantage is scalability. AWS VPC allows you to scale your IoT infrastructure as your needs grow. Whether you’re managing a handful of devices or an entire fleet, AWS provides the tools and resources to handle the workload efficiently.
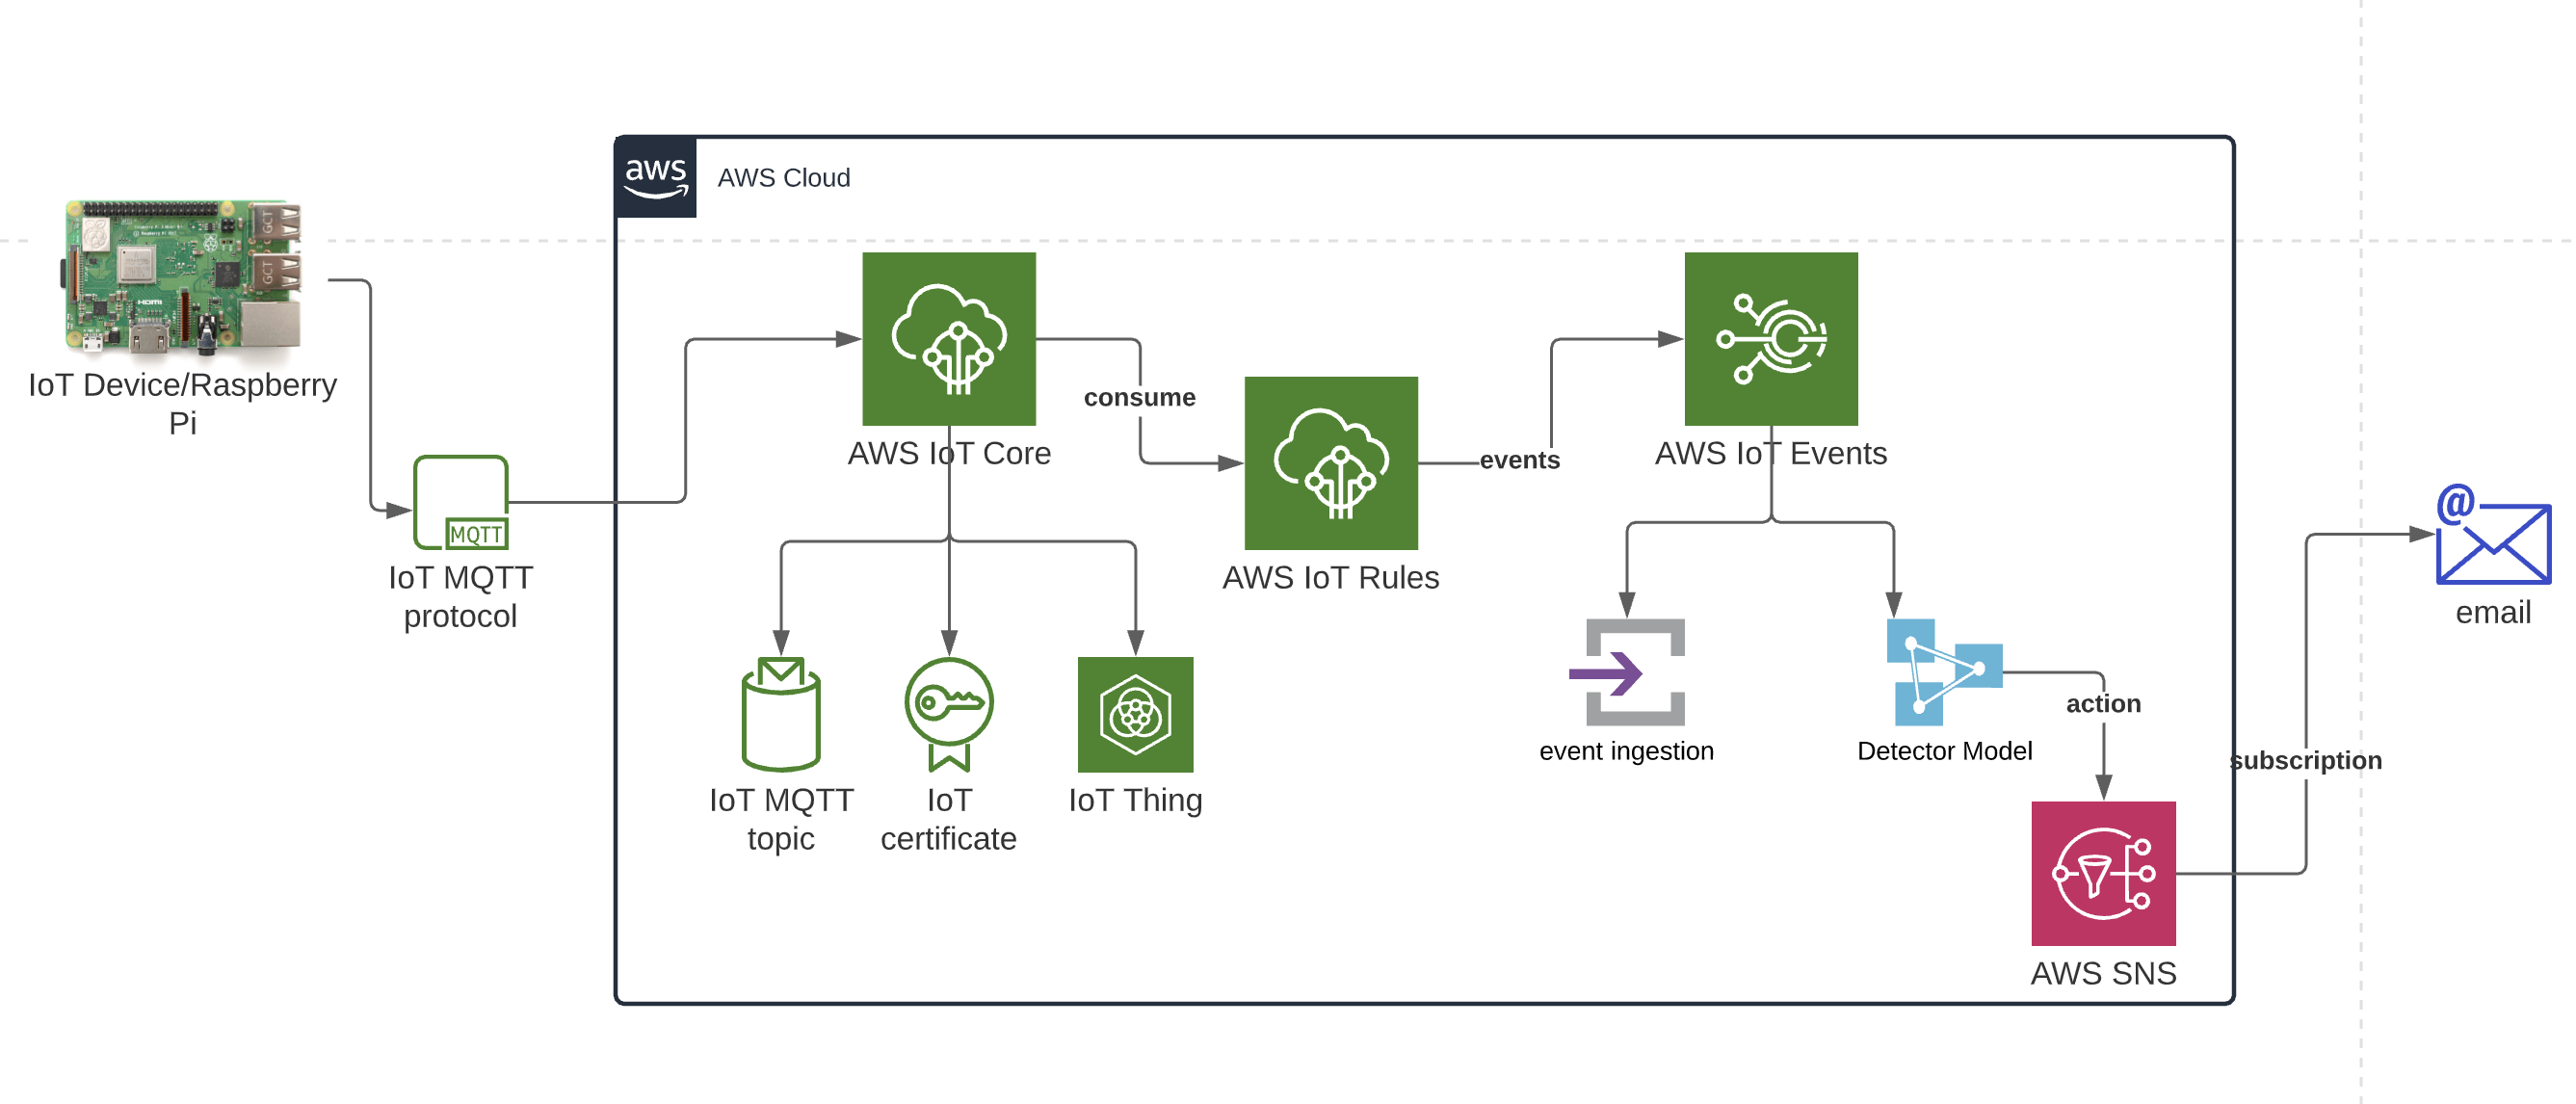
Additionally, this setup enables seamless integration with other AWS services, such as AWS IoT Core, Lambda, and S3. These services can help you process, analyze, and store IoT data, providing valuable insights and improving decision-making.
Prerequisites for Setting Up the Connection
Before you begin setting up the connection between your Raspberry Pi and AWS VPC, there are a few prerequisites you need to fulfill:
- AWS Account: You’ll need an active AWS account. If you don’t have one, you can sign up for the AWS Free Tier, which includes a limited amount of resources for free.
- Raspberry Pi: Ensure you have a Raspberry Pi with a compatible operating system installed, such as Raspberry Pi OS.
- Internet Connectivity: Your Raspberry Pi must have a stable internet connection to communicate with AWS.
- AWS CLI: Install the AWS Command Line Interface (CLI) on your Raspberry Pi to interact with AWS services.
- Basic Networking Knowledge: Familiarity with networking concepts like IP addressing, subnets, and routing is essential.
Setting Up Your Raspberry Pi for AWS Integration
To prepare your Raspberry Pi for AWS integration, follow these steps:
- Update the System: Run the following commands to update your Raspberry Pi’s software:
sudo apt update && sudo apt upgrade - Install AWS CLI: Use the following command to install the AWS CLI:
curl "https://awscli.amazonaws.com/awscli-exe-linux-arm.zip" -o "awscliv2.zip" && unzip awscliv2.zip && sudo ./aws/install - Configure AWS CLI: Run the following command to configure AWS CLI with your credentials:
Enter your AWS Access Key ID, Secret Access Key, region, and output format when prompted.aws configure
Once these steps are completed, your Raspberry Pi will be ready to interact with AWS services.
Configuring AWS VPC for Raspberry Pi
Configuring AWS VPC involves creating a virtual network and setting up the necessary resources to connect your Raspberry Pi securely. Follow these steps:
- Create a VPC: Log in to the AWS Management Console, navigate to the VPC Dashboard, and create a new VPC. Specify the IP address range and other settings as needed.
- Set Up Subnets: Create public and private subnets within your VPC. Public subnets are used for internet-facing resources, while private subnets are for internal resources.
- Configure Route Tables: Define route tables to control traffic flow between your Raspberry Pi and other resources in the VPC.
- Enable Security Groups: Set up security groups to restrict access to your VPC resources, ensuring only authorized devices can connect.
By following these steps, you can create a secure and functional VPC environment for your Raspberry Pi.
Establishing a Secure Connection
Establishing a secure connection between your Raspberry Pi and AWS VPC is crucial for protecting your IoT data. There are several methods to achieve this, including using SSH and configuring a VPN.
Using SSH for Secure Access
SSH (Secure Shell) is a protocol that provides secure access to remote devices. To use SSH for connecting your Raspberry Pi to AWS VPC:
- Generate an SSH key pair on your Raspberry Pi using the following command:
ssh-keygen -t rsa -b 4096 - Upload the public key to AWS by navigating to the EC2 Dashboard, selecting "Key Pairs," and importing the key.
- Use the private key to establish an SSH connection to your VPC resources.
Configuring a VPN for Enhanced Security
A VPN (Virtual Private Network) provides an additional layer of security by encrypting all traffic between your Raspberry Pi and AWS VPC. To configure a VPN:
- Create a Virtual Private Gateway in the AWS Management Console.
- Attach the gateway to your VPC and configure routing.
- Set up a VPN client on your Raspberry Pi and connect to the gateway.
Monitoring and Maintaining the Connection
Once your Raspberry Pi is connected to AWS VPC, it’s important to monitor and maintain the connection to ensure optimal performance and security.
- Use AWS CloudWatch: AWS CloudWatch provides real-time monitoring of your VPC resources, allowing you to track performance metrics and set up alerts for potential issues.
- Regularly Update Software: Keep your Raspberry Pi’s operating system and AWS CLI updated to protect against vulnerabilities.
- Review Security Groups: Periodically review and update your security group rules to ensure they align with your current security requirements.
Cost Optimization with AWS Free Tier
AWS offers a free tier that includes a limited amount of resources for new users. To optimize costs while securely connecting your Raspberry Pi to AWS VPC:
- Utilize the free tier’s 750 hours of EC2 instances per month.
- Take advantage of free data transfer allowances within the VPC.
- Monitor your usage regularly to avoid exceeding the free tier limits.
Troubleshooting Common Issues
When setting up and maintaining the connection between your Raspberry Pi and AWS VPC, you may encounter some common issues:
- Connectivity Problems: Ensure your Raspberry Pi has a stable internet connection and that your VPC’s security groups allow traffic from your device.
- Authentication Errors: Double-check your AWS credentials and SSH key configuration.
- Performance Bottlenecks: Optimize your VPC’s route tables and subnets to improve traffic flow.
Conclusion and Next Steps
Securely connecting your Raspberry Pi to AWS VPC is a powerful way to manage IoT devices and data while ensuring security and scalability. By following the steps outlined in this guide, you can create a robust and efficient IoT infrastructure that leverages the capabilities of AWS cloud services.
Now that you’ve learned how to securely connect your Raspberry Pi to AWS VPC, consider exploring additional AWS services like AWS IoT Core and Lambda to further enhance your IoT applications. Share your experience in the comments below, and don’t forget to check out our other articles for more insights into IoT and cloud computing.
You Might Also Like
RemoteIoT Web SSH Download Android: A Comprehensive GuideSecurely Connect RemoteIoT VPC Raspberry Pi AWS Free: A Comprehensive Guide
SSH RemoteIoT Device Free Download: A Comprehensive Guide For Secure Remote Access
Fry.99com: A Comprehensive Guide To Understanding And Utilizing The Platform
SSH RemoteIoT Device Raspberry Pi: Free Download For Mac
Article Recommendations