Drawing Shrek can be a delightful and rewarding experience, especially for fans of the lovable ogre from the DreamWorks animated films. Whether you're an experienced artist or a beginner, capturing Shrek's unique features and charm can be a fun challenge. His distinct facial expressions, iconic ears, and warm personality make him a favorite subject for artists around the world. Learning how to draw Shrek involves understanding the basic shapes and proportions that make up his character, as well as adding intricate details to bring him to life on paper.
To start your journey in drawing Shrek, it's important to gather the necessary materials and set the stage for a successful sketch. A good quality sketchbook, pencils of varying hardness, an eraser, and a sharpener are essential tools for any artist. A clean and well-lit workspace will also help you focus on your artwork. By following step-by-step instructions, you can gradually build your skills and confidence in drawing Shrek. From outlining his head to adding finishing touches, each stage provides an opportunity to practice and refine your drawing abilities.
As you dive into the world of drawing Shrek, remember that practice makes perfect. Don't be discouraged if your first attempts don't turn out exactly as you imagined. With patience and perseverance, you'll be able to capture Shrek's personality and essence in your drawings. This guide will walk you through the entire process, providing helpful tips and techniques to enhance your artistic skills. So grab your pencils and get ready to bring Shrek to life on your canvas!
Table of Contents
- Shrek: A Brief Biography
- Personal Details of Shrek
- What materials do you need to draw Shrek?
- Step-by-Step Guide on How to Draw Shrek
- How to start drawing Shrek's head?
- Adding Details: What makes Shrek unique?
- Coloring Tips: How to bring Shrek to life?
- Common Mistakes & How to Avoid Them
- How to improve your drawing skills over time?
- Finding Inspiration and Creativity in Drawing
- Advanced Techniques for Drawing Shrek
- Exploring Different Artistic Interpretations of Shrek
- Frequently Asked Questions
- Conclusion
Shrek: A Brief Biography
Shrek, the iconic character from the DreamWorks animated franchise, was first introduced to audiences in the 2001 film "Shrek." He is a large, green ogre with a heart of gold, known for his gruff exterior and soft interior. Shrek lives in a swamp, preferring solitude and peace, away from the hustle and bustle of the kingdom of Far Far Away. Despite his desire for a quiet life, Shrek's adventures often lead him to interact with various fairy tale characters, forming lasting friendships and creating a family of his own.
Over the years, Shrek has become a beloved figure in popular culture, known for his humor, wisdom, and unique perspective on life. His journey from a solitary ogre to a loving husband and father is a central theme in the series, resonating with audiences worldwide. Shrek's loyal companion, Donkey, and his love interest, Fiona, play significant roles in his story, adding depth and complexity to his character. The franchise's success has spawned sequels, spin-offs, and a dedicated fan base, cementing Shrek's place in the annals of animated film history.
Personal Details of Shrek
| Characteristic | Details |
|---|---|
| Full Name | Shrek |
| Species | Ogre |
| Occupation | Hero, Swamp Resident |
| Family | Fiona (wife), Three children |
| Residence | Swamp |
What materials do you need to draw Shrek?
Before starting your Shrek drawing, gather the necessary materials to ensure a smooth and enjoyable artistic experience. Having the right tools at your disposal will make the process more efficient and help you achieve better results. Here's a list of materials you'll need:
- Sketchbook or Drawing Paper: Choose a good quality sketchbook or drawing paper to provide a sturdy surface for your artwork.
- Pencils: Use a range of pencils, from hard (H series) to soft (B series), to create different shades and textures in your drawing.
- Eraser: A kneaded eraser or a vinyl eraser will help you correct mistakes and refine your sketch.
- Sharpener: Keep your pencils sharp for precise lines and details.
- Ruler: A ruler can be useful for measuring proportions and creating straight lines.
- Colored Pencils or Markers: Add color to your drawing with colored pencils or markers to bring Shrek to life.
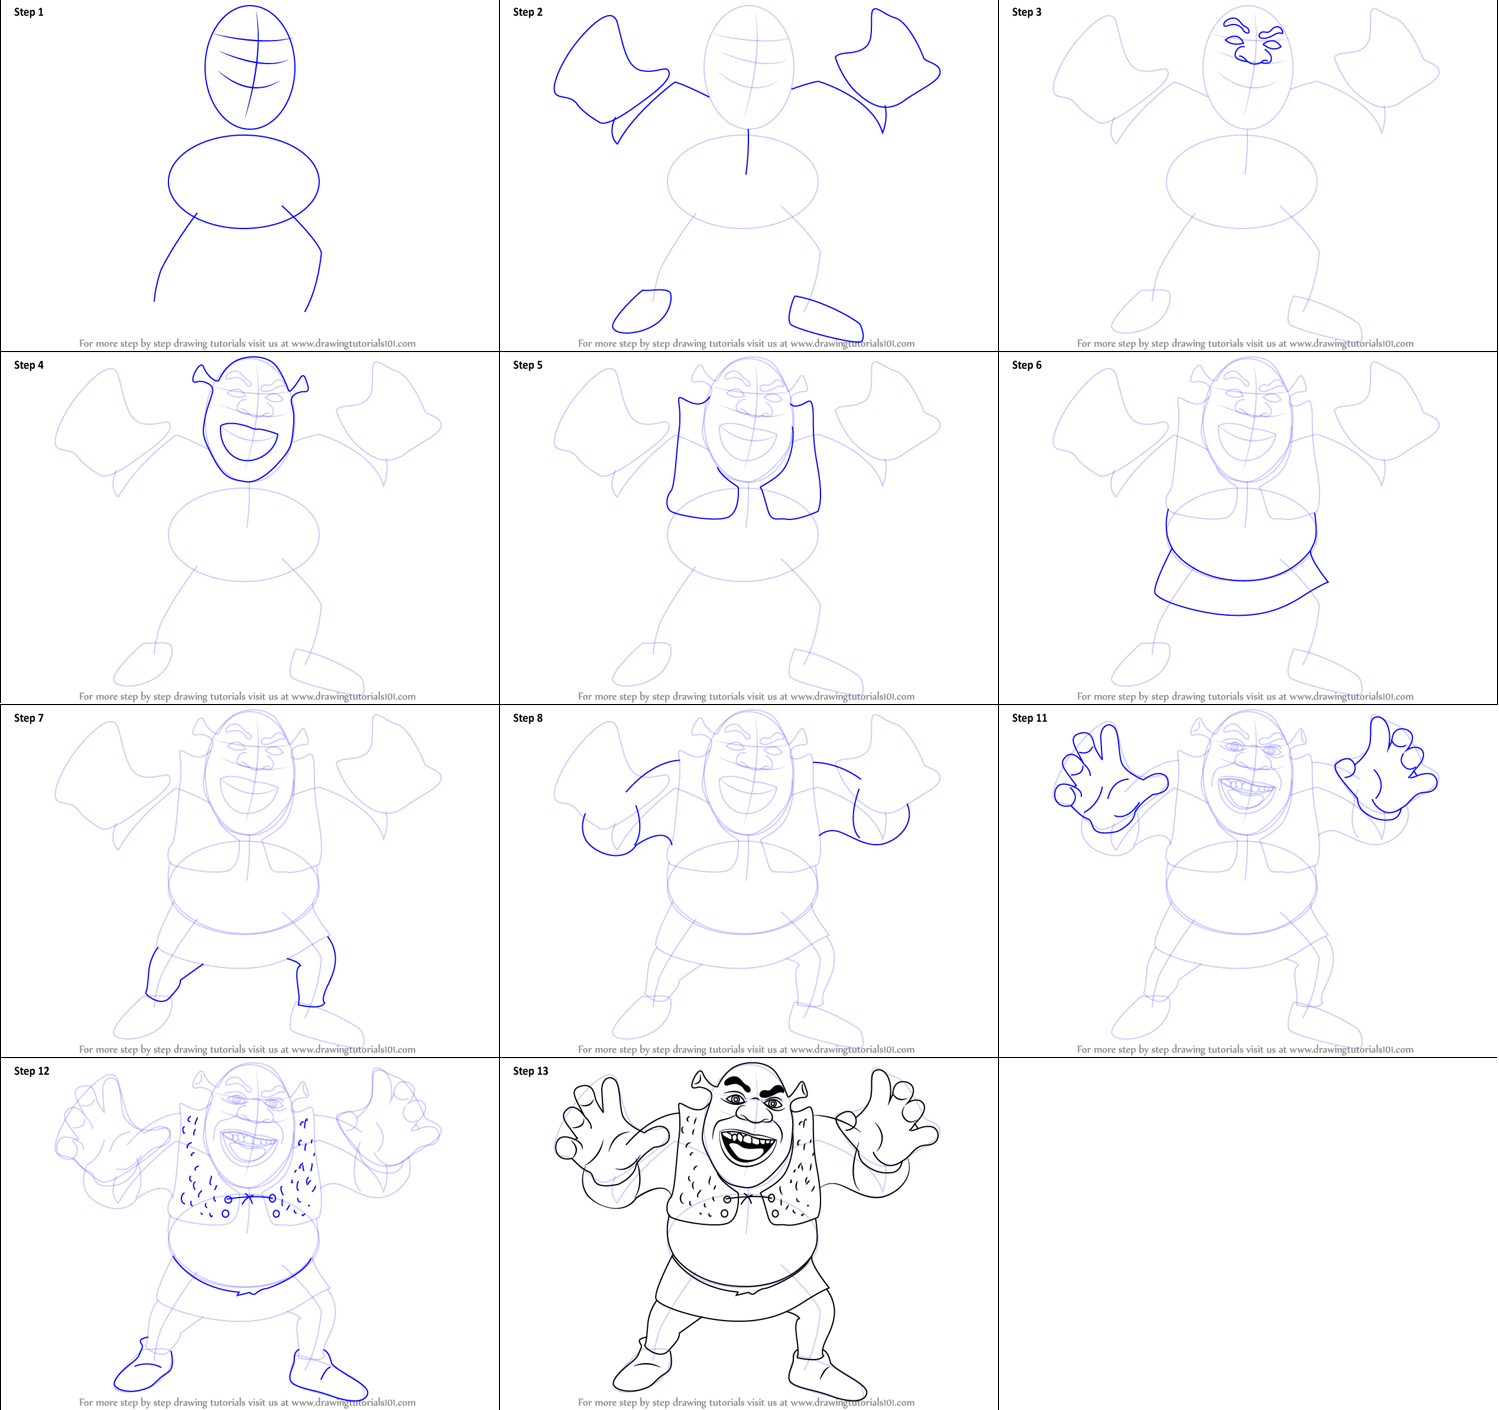
Step-by-Step Guide on How to Draw Shrek
Drawing Shrek can be a delightful experience, and breaking down the process into manageable steps will make it more approachable. Follow this step-by-step guide to create your own Shrek masterpiece:
- Outline the Head: Start by sketching an oval shape for Shrek's head. This will serve as the foundation for his facial features.
- Draw the Facial Features: Add Shrek's eyes, nose, and mouth. Pay attention to his distinct features, such as his wide grin and expressive eyes.
- Sketch the Ears: Draw Shrek's iconic trumpet-shaped ears on either side of his head.
- Define the Jawline: Shrek has a prominent jawline, so make sure to outline it clearly.
- Outline the Body: Use basic shapes to sketch Shrek's body, including his broad shoulders and round belly.
- Add Arm and Leg Details: Draw Shrek's muscular arms and legs, paying attention to proportions and positioning.
- Add Clothing Details: Sketch Shrek's signature outfit, including his vest and boots.
- Refine the Sketch: Go over your drawing with a fine pencil, refining lines and adding details.
- Erase Guidelines: Remove any unnecessary guidelines to clean up your sketch.
- Add Color (Optional): Use colored pencils or markers to add color to your drawing, capturing Shrek's green skin and brown clothing.
How to start drawing Shrek's head?
Drawing Shrek's head is the first step in capturing his unique character. Begin by lightly sketching an oval shape to serve as the base for his head. This oval will help you determine the overall size and shape of Shrek's head, allowing you to position his facial features accurately.
Once you have the basic oval shape, divide it into sections using guidelines. Draw a vertical line down the center of the oval to mark the middle of Shrek's face. Then, add a horizontal line to divide the oval into upper and lower halves. These guidelines will help you place Shrek's eyes, nose, and mouth symmetrically.
Next, focus on drawing Shrek's eyes. His eyes are large and expressive, so make sure they are evenly spaced and aligned with the horizontal guideline. Draw two ovals for the eyes and add circles inside them for the pupils. Shrek's nose is broad and rounded, positioned between his eyes. Sketch the outline of his nose, ensuring it sits just below the horizontal guideline.
Shrek's mouth is one of his most recognizable features, often depicted in a wide, friendly smile. Draw the mouth line below the nose, curving it slightly upward to create a smiling expression. Add details such as his lips and teeth to enhance the realism of your drawing.
Adding Details: What makes Shrek unique?
When drawing Shrek, the details are what truly bring the character to life and capture his essence. Here are some key details to focus on:
- Facial Features: Pay attention to Shrek's facial features, such as his wide jawline, expressive eyes, and signature smile. These elements are essential to capturing his personality.
- Ears: Shrek's trumpet-shaped ears are one of his most iconic features. Make sure they are correctly positioned and proportioned on either side of his head.
- Skin Texture: Shrek's skin is often depicted as textured and slightly rough. Use shading techniques to create this effect, adding depth to your drawing.
- Clothing Details: Shrek's clothing consists of a simple vest and boots. Pay attention to the folds and creases in his clothing to make it look realistic.
Adding these details will enhance the overall quality of your drawing and help you capture Shrek's unique character. Remember to take your time and refine your sketch as needed to achieve the desired level of detail.
Coloring Tips: How to bring Shrek to life?
Coloring your Shrek drawing can add vibrancy and realism, bringing the character to life on your canvas. Here are some tips for coloring Shrek:
- Choose the Right Colors: Use shades of green for Shrek's skin, brown for his clothing, and a hint of pink for his lips.
- Layer Colors: Start with a light layer of color and gradually build up to achieve the desired intensity. This technique creates depth and dimension.
- Blend Colors: Use blending tools or your finger to smooth out the colors and create a seamless transition between shades.
- Add Highlights and Shadows: Use lighter colors to add highlights to Shrek's skin and clothing, and darker shades to create shadows and depth.
By following these coloring tips, you can enhance the overall appearance of your Shrek drawing and make it more visually appealing.
Common Mistakes & How to Avoid Them
When learning how to draw Shrek, it's common to encounter challenges and make mistakes. Here are some common mistakes and tips on how to avoid them:
- Proportion Errors: Ensure that Shrek's facial features and body parts are correctly proportioned. Use guidelines to help maintain symmetry and balance.
- Flat Appearance: Avoid a flat appearance by incorporating shading and highlights to create depth and dimension.
- Overworking the Drawing: Be careful not to overwork your drawing, as this can lead to smudging and loss of detail. Take breaks and step back to assess your progress.
- Lack of Detail: Pay attention to the details that make Shrek unique, such as his ears and skin texture. These elements are crucial for capturing his character.
By being mindful of these common mistakes, you can improve your drawing skills and create a more polished and accurate representation of Shrek.
How to improve your drawing skills over time?
Improving your drawing skills is a continuous journey that requires practice and dedication. Here are some tips to help you enhance your drawing abilities over time:
- Practice Regularly: Consistent practice is key to improving your skills. Set aside time each day or week to work on your drawing projects.
- Study Anatomy: Understanding the basics of human and animal anatomy can help you create more realistic and accurate drawings.
- Experiment with Different Styles: Explore various drawing styles and techniques to find what works best for you and expand your artistic repertoire.
- Seek Feedback: Share your work with others and seek constructive feedback to identify areas for improvement.
By following these tips and remaining committed to your artistic growth, you can steadily improve your drawing skills and create impressive artwork.
Finding Inspiration and Creativity in Drawing
Inspiration and creativity are essential components of the artistic process. Here are some ways to find inspiration and fuel your creativity when drawing:
- Explore Different Sources: Look for inspiration in books, movies, nature, and everyday life. You never know where you'll find a spark of creativity.
- Create a Mood Board: Gather images, colors, and textures that inspire you and create a mood board to refer to when you're feeling stuck.
- Try New Techniques: Experiment with different drawing techniques and mediums to discover new ways of expressing your creativity.
- Embrace Mistakes: Don't be afraid to make mistakes. Sometimes, they can lead to unexpected and exciting artistic breakthroughs.
By actively seeking inspiration and embracing your creativity, you can enhance your artistic journey and bring fresh ideas to your drawing projects.
Advanced Techniques for Drawing Shrek
Once you've mastered the basics of drawing Shrek, you may want to explore advanced techniques to further enhance your artwork. Here are some advanced techniques to consider:
- Detailed Shading: Use advanced shading techniques to create realistic textures and depth in Shrek's skin and clothing.
- Dynamic Posing: Experiment with different poses and angles to add movement and energy to your drawing.
- Background Elements: Add background elements, such as Shrek's swamp or other fairy tale settings, to create a complete scene.
- Mixed Media: Combine different artistic mediums, such as watercolors or digital tools, to add complexity and richness to your artwork.
By incorporating these advanced techniques into your drawing process, you can create more intricate and captivating representations of Shrek.
Exploring Different Artistic Interpretations of Shrek
Shrek's character has been interpreted in various artistic styles and mediums, offering endless possibilities for creative expression. Here are some ways to explore different artistic interpretations of Shrek:
- Cartoon Style: Emphasize Shrek's playful and humorous side by drawing him in a cartoon style with exaggerated features.
- Realistic Style: Challenge yourself by creating a realistic portrait of Shrek, focusing on accurate proportions and details.
- Abstract Style: Experiment with abstract elements, using shapes and colors to convey Shrek's personality and emotions.
- Fan Art: Create fan art that incorporates Shrek into different universes or scenarios, blending his character with other beloved characters.
By exploring different artistic interpretations, you can broaden your creative horizons and develop a unique style that reflects your artistic vision.
Frequently Asked Questions
- What is the best way to start drawing Shrek? Begin by outlining Shrek's head with basic shapes and gradually add facial features and details.
- How can I achieve realistic shading in my Shrek drawing? Use a range of pencil shades and blending techniques to create depth and texture in Shrek's skin.
- What are some common mistakes to avoid when drawing Shrek? Avoid proportion errors, overworking the drawing, and neglecting key details that define Shrek's character.
- How can I add color to my Shrek drawing effectively? Choose the right colors, layer and blend them, and use highlights and shadows to enhance realism.
- What resources can I use to improve my drawing skills? Online tutorials, art books, and drawing classes are excellent resources for learning and improving your skills.
- How can I find inspiration for my Shrek drawings? Look to various sources such as movies, nature, and everyday life, and create a mood board to spark creativity.
Conclusion
Drawing Shrek is an enjoyable and rewarding experience that allows artists to express their creativity and connect with a beloved character. By following this comprehensive guide, you can learn how to draw Shrek step-by-step, from outlining his head to adding intricate details and colors. Remember to gather the necessary materials, avoid common mistakes, and embrace your artistic journey with an open mind and a willingness to learn.
As you continue to practice and explore different artistic interpretations of Shrek, you'll develop your skills and create unique representations of the iconic ogre. Whether you're a beginner or an experienced artist, the process of drawing Shrek offers endless opportunities for growth and creativity. So grab your pencils, let your imagination run wild, and bring Shrek to life on your canvas!
You Might Also Like
Charting The Phenomenal Success: Jay-Z Album Sales WorldwideOlivia Dunne Major: A Deep Dive Into Her Academic Pursuits
Conor McGregor Age: The Rise Of A UFC Legend
Unveiling Till Lindemann's Age And Legacy: The Life Of A Rock Icon
Insights Into Kathy Smith Fitness: A Timeless Approach To Health And Well-being
Article Recommendations